


Extend synchronization individually in a few steps
Since a few weeks the synchronization between Business Central and Sales can be extended in a few steps. This works both with individual fields added to standard tables and with entirely new tables and their fields.
1.1 Create fields in Sales and Business Central
In Sales create new fields in an entity so that they can be taken into account for synchronization if necessary.
Possibly also create new fields or new tables in Business Central if they are to be synchronized with Sales.
1.2 Determine differences in Sales/BC and create table extension
Run the following Powershell script:
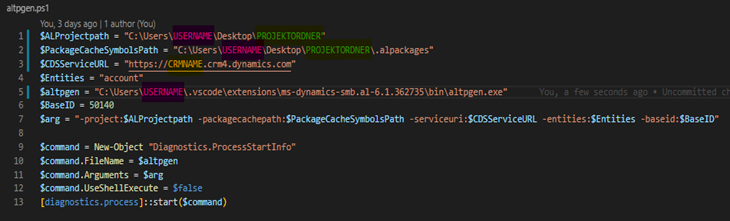
Replace USERNAME, PROJECTORDNER, CRMNAME accordingly. Replace the CRM/Sales entity customized in the first step in the script ($Entities).
If necessary, adjust the path to altpgen.exe.
(The code to copy is in the attachment)
Running this script makes a match between the entity state in CRM/Sales and the corresponding tables in Business Central.
Also, a Table Extension is automatically created by the script, which contains the new fields in CRM/Sales.

The fields with the prefix “new_” here represent the manually created fields in CRM/Sales.
1.1 Adding fields to the automatic synchronization setup
In Business Central, a code unit with an event subscriber is required.
Here you have the possibility to add your own tables to the CRM/Sales Mapping, but also to extend existing tables with additional fields.
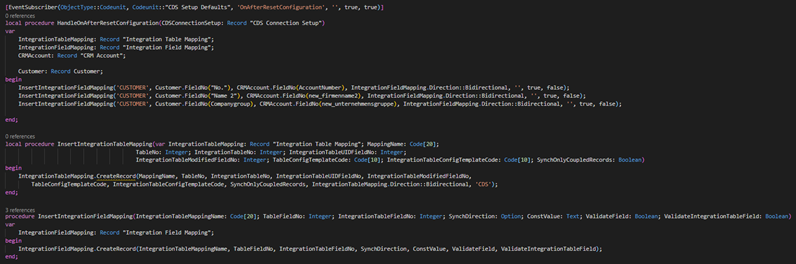
The event subscriber is triggered when the CRM synchronization settings are reset.
In the call, complete tables can be added to the synchronization, but also only individual fields of already synchronized tables can be added.
The auxiliary function “InsertIntegrationFieldMapping” adds a connection of a BC and a CRM/Sales field to a table/entity.
The auxiliary function “InsertIntegrationTableMapping” adds any table of the integration tables.
The code to copy is in the attachment.
1.1 Synchronization Triggers in Business Central
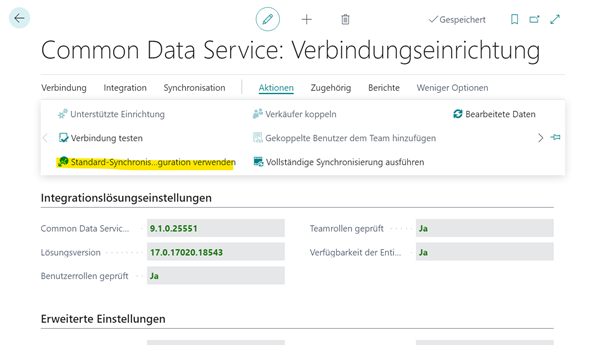
To ensure that the added tables are now also taken into account by the CRM synchronization, the synchronization must be reset once.
For this, the “Common Data Service: Connection Setup” page is opened and the following action is executed: “Use default synchronization configuration”.
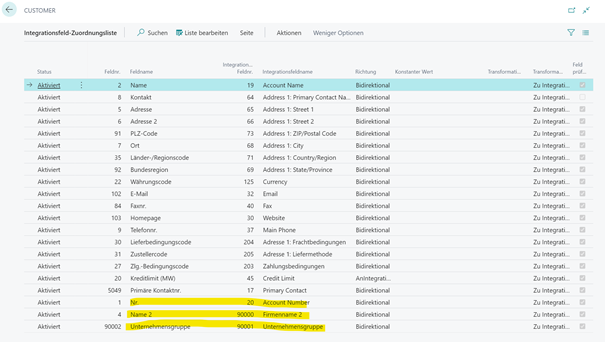
Once the configuration is reset, the custom added fields (and tables) will appear in the integration table mapping:
Appendix: Powershell script for copying:
$ALProjectpath = “C:\Users\WINUSERNAME\Desktop\PROJECTNAME”
$PackageCacheSymbolsPath = “C:\Users\WINUSERNAME\Desktop\PROJECTNAME\.alpackages”
$CDSServiceURL = “https://CRMNAME.crm4.dynamics.com”
$Entities = “account
$altpgen = “C:\Users\WINUSERNAME\.vscode\extensions\ms-dynamics-smb.al-6.1.381323\bin\altpgen.exe”
$BaseID = 50140
$arg = “-project:$ALProjectpath -packagecachepath:$PackageCacheSymbolsPath -serviceuri:$CDSServiceURL -entities:$Entities -baseid:$BaseID”
$command = New-Object “Diagnostics.ProcessStartInfo”
$command.FileName = $altpgen
$command.Arguments = $arg
$command.UseShellExecute = $false
[diagnostics .process]::start($command)